We wanted a large, covered area that we can use as an outdoor kitchen during our build. This will become an entertaining space later on, and is a great water collection surface. We'd done up rough plans, and had a few chats with my folks about it, but at the time Kyle and I were really focused on getting the toilet block finished.
Apparently, when you tell your Dad "jeez, I'd really like an outdoor kitchen..." you come back 3 days later to cleared and leveled ground, two retaining walls, and 6 post holes.
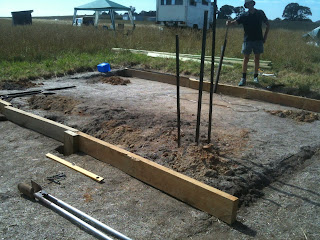
We thought we should catch up at that point and buy the timber for the structure, so we let him loose on the maths of putting it all together. There was much discussion about dimensions (6m x 4m, determined by the size of readily available timber) and how many beams/rafters to have, during which we scribbled madly trying to end up with a common vision for how it would fit together.

After clearing the grass, Dad levelled the site with the help of two stakes, 10m of clear plastic tubing and some potassium permanganate (makes the water level easier to see - you can usually get it at a pharmacy).

He tells me that each of the post holes is within 1cm of the depth of each of the others. He was a bit grumpy when we insisted he put some gravel in the bottom first, saying it messed up his measurements.
Because of the slope we'll have a short retaining wall at the top and bottom of the structure. We had the sleepers already (we bought about 35 of them cheap and used some for roof beams in the toilet block), so that was an easy fix. The structure is set up so that the posts will form part of the supports for the retaining walls, but because of the length of the sleepers this isn't quite sufficient so we had a few shorter sleepers to hold the rest of it up. The bolts came with the sleepers when we bought them, so again a neat solution.

The bottom of each hole has a few inches of gravel and some sand we dug up from the creek bank, just enough to lift the posts out of the soil before we put some quickset concrete around the base. After much debate, we used rounded poles instead of square ones. Kyle tells me you can't get square ones that are treated better than H3 (at least, we couldn't get them), and since these are going in the ground we wanted to be thorough. We weren't as careful with the toilet block posts (we're still learning), so I guess over the next 20 years we'll see the difference. In reality, I suspect longevity has a lot more to do with drainage and not letting water sit at the base of the posts. We contemplated using metal stirrups and decided it was too hard to get them in exactly the right spot - we'll tackle that one on some other project I imagine.
After that, Dad cut ledges in the top of each posts, and on a fine day Kyle went out and helped concrete them while I was at work.


You'll notice here that the posts on the downhill side are a bit taller than the posts on the uphill side. There was considerable discussion over which way to slope the roof - my parents argued for sloping it against the hill to maximise the view, whereas Kyle and I are practical people and were much more concerned about rain and sun getting in. Eventually we decided on the former, as it makes the hookup to the eventual water tank a bit easier.
We'll wait a few days until the concrete is really set before adding the beams. Dad did admit at one point that his precision measurements probably wouldn't hold up to reality, so we made sure we bought cross beams that were a little longer than the intended measurements (4.2m rather than 4m) so we could cut them to fit if we messed up elsewhere. Also, as they are at an angle they need to be slightly longer than 4m anyway to reach.
No comments:
Post a Comment